http://thesolving.com/storage/how-to-create-an-iscsi-target-with-freenas/
How to create an iSCSI target with FreeNAS

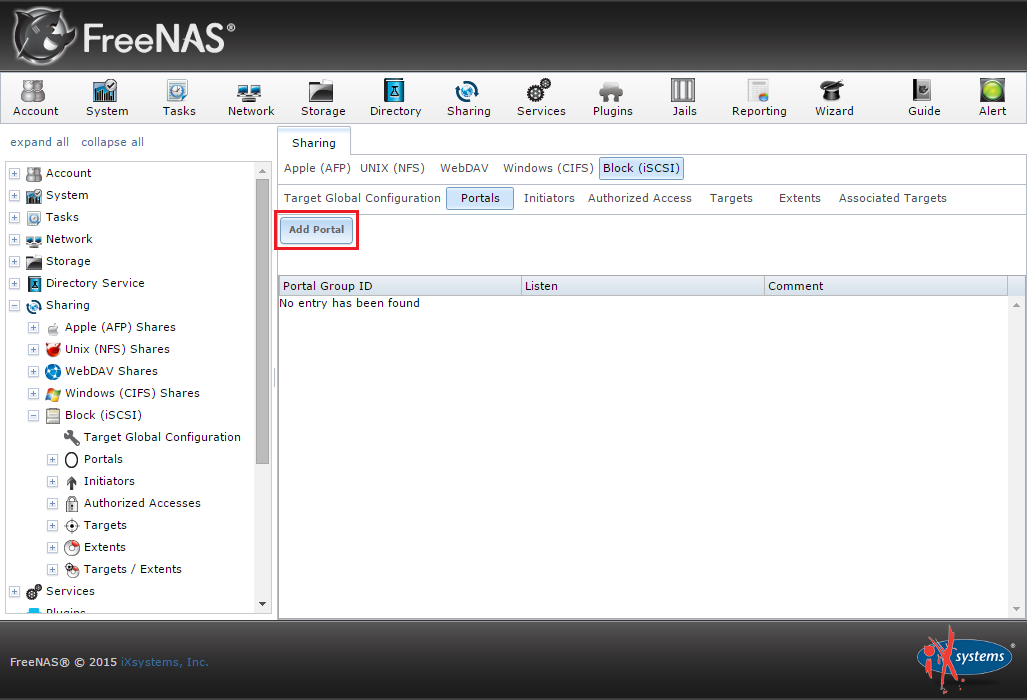
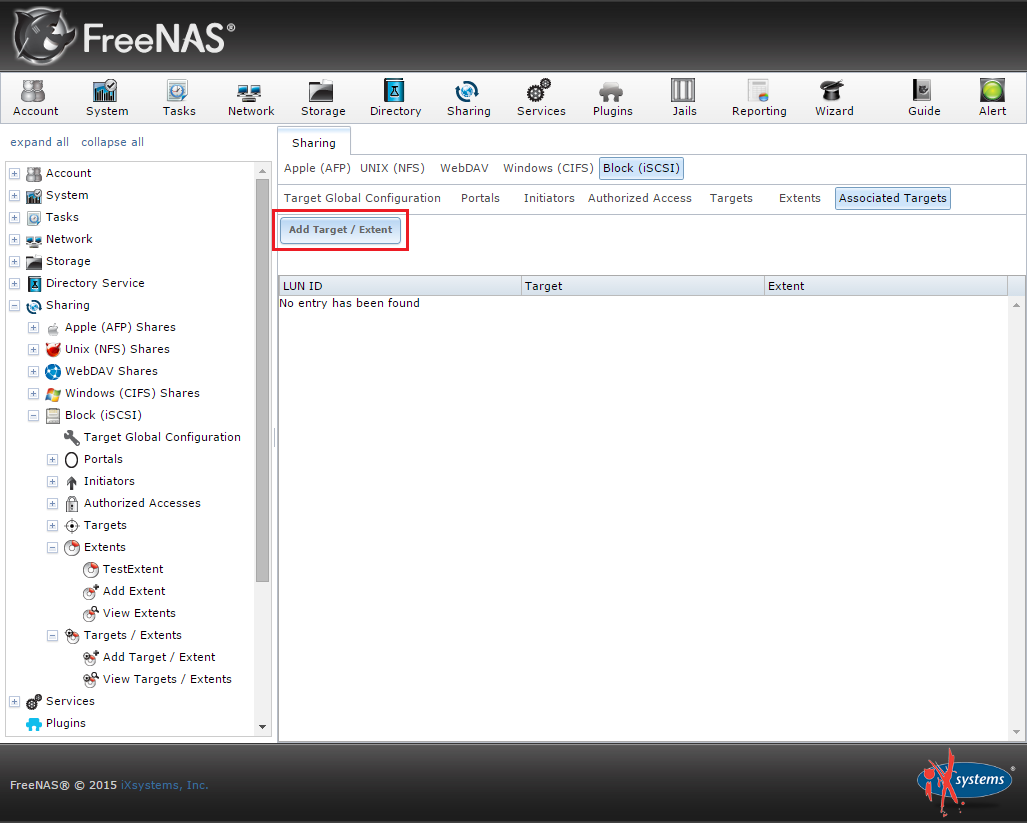
Navigate to the Block (iSCSI) menu:

Under the Portals tab click Add Portal:
You’ll be able to configure a network interface (with its IP address) as the Portal:

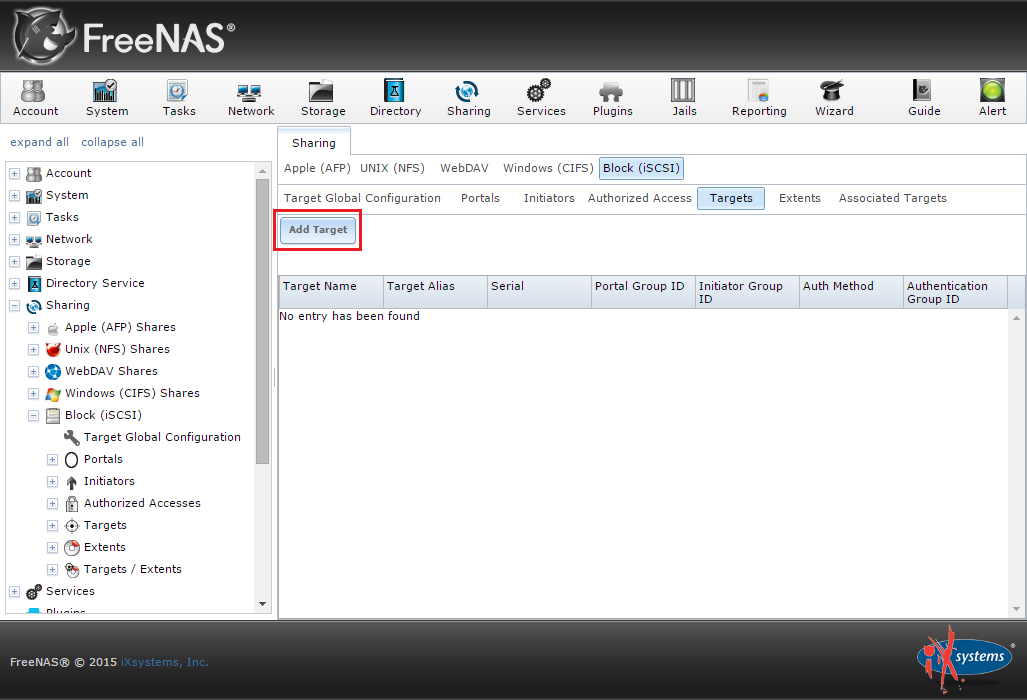
Go to the Target tab and click Add Target:
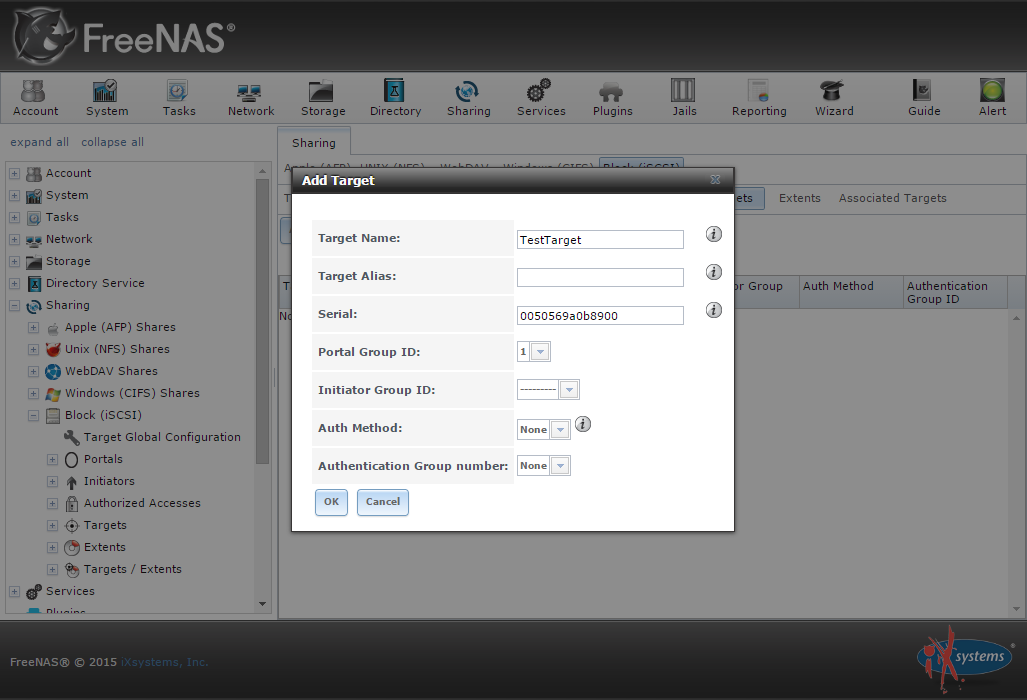
Give it a name and select the Portal Group ID (in our example there’s only an ID available):
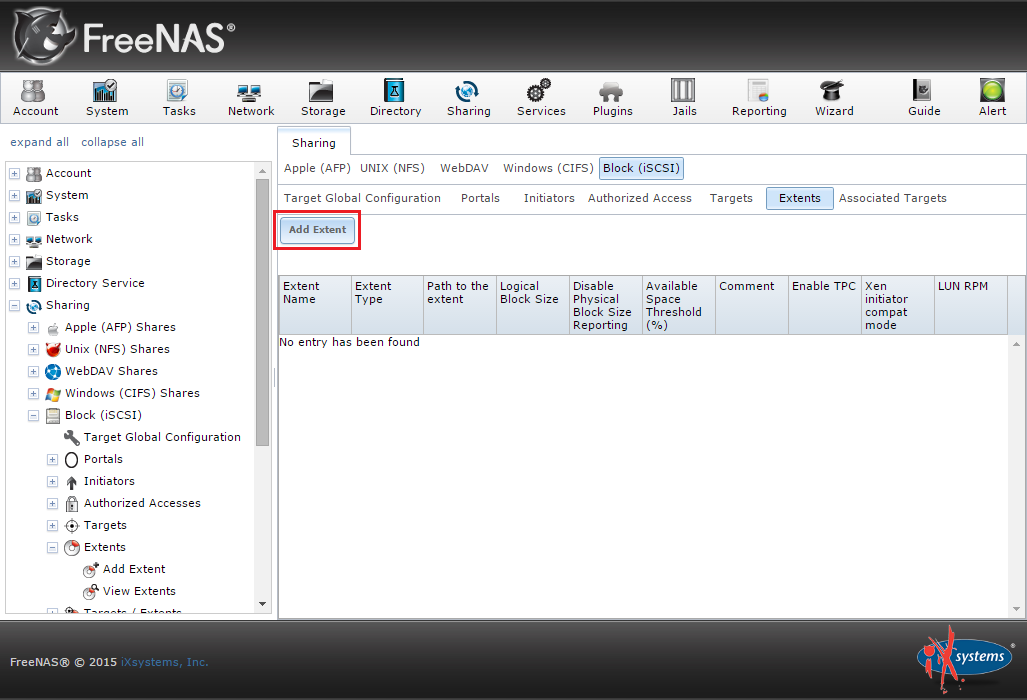
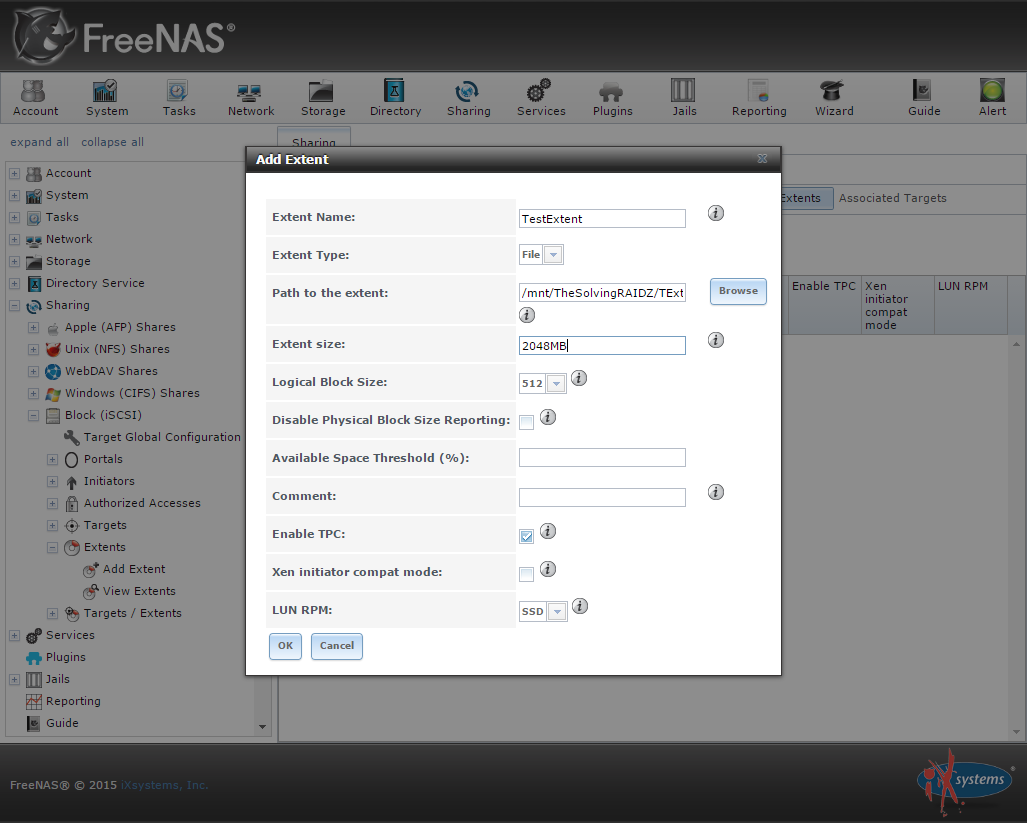
The Extent must be associated to a Target, a quite easy step:

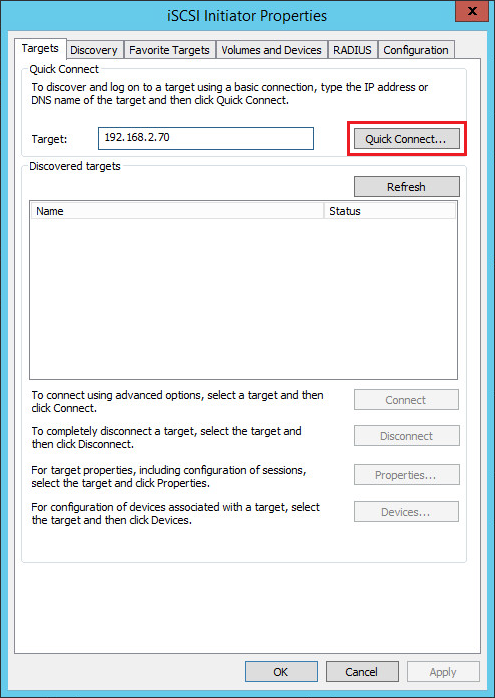
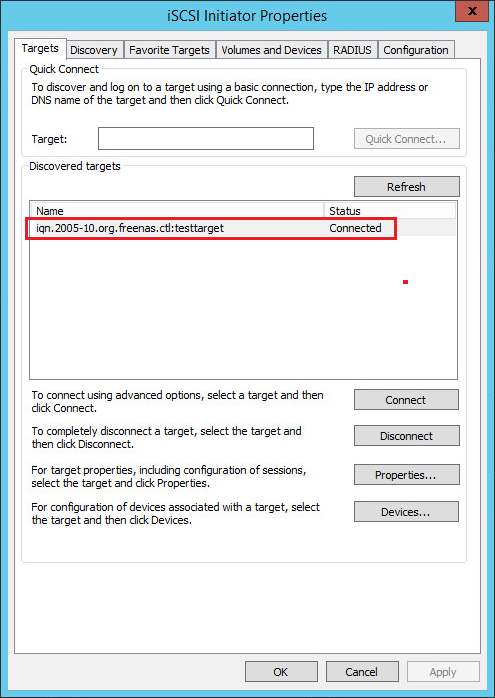
Configuration completed! You can now connect your Windows PC/server to the iSCSI target. Open the iSCSI Initiator from the Control Panel. Specify the IP address used during the Portal configuration and click Quick Connect:
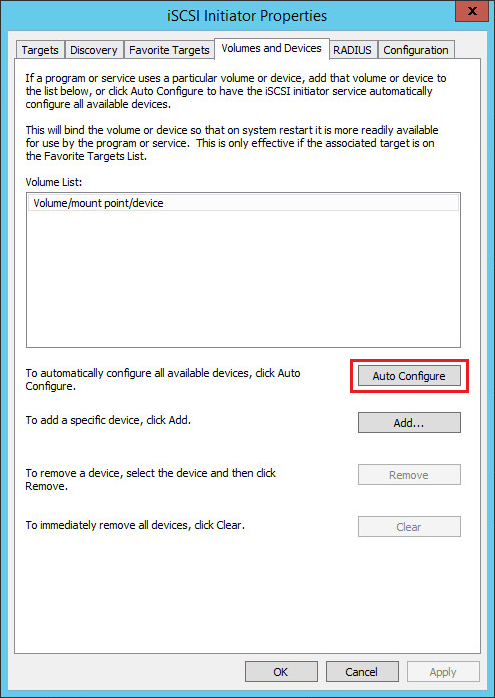
Go to the Volume and Devices tab and click Auto Configure:
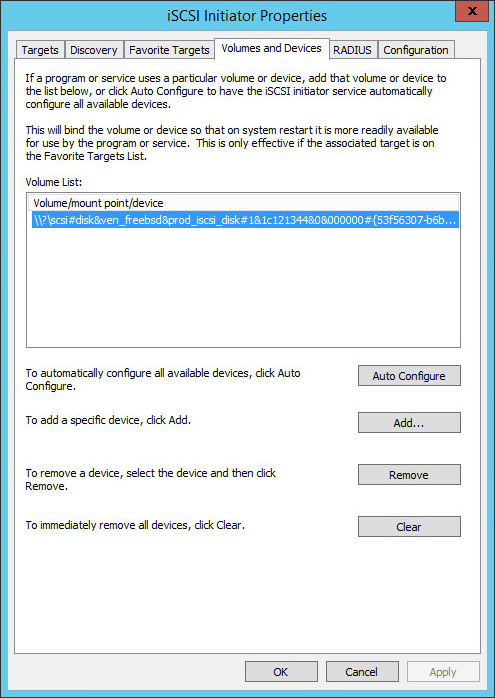
The new volume will appear:
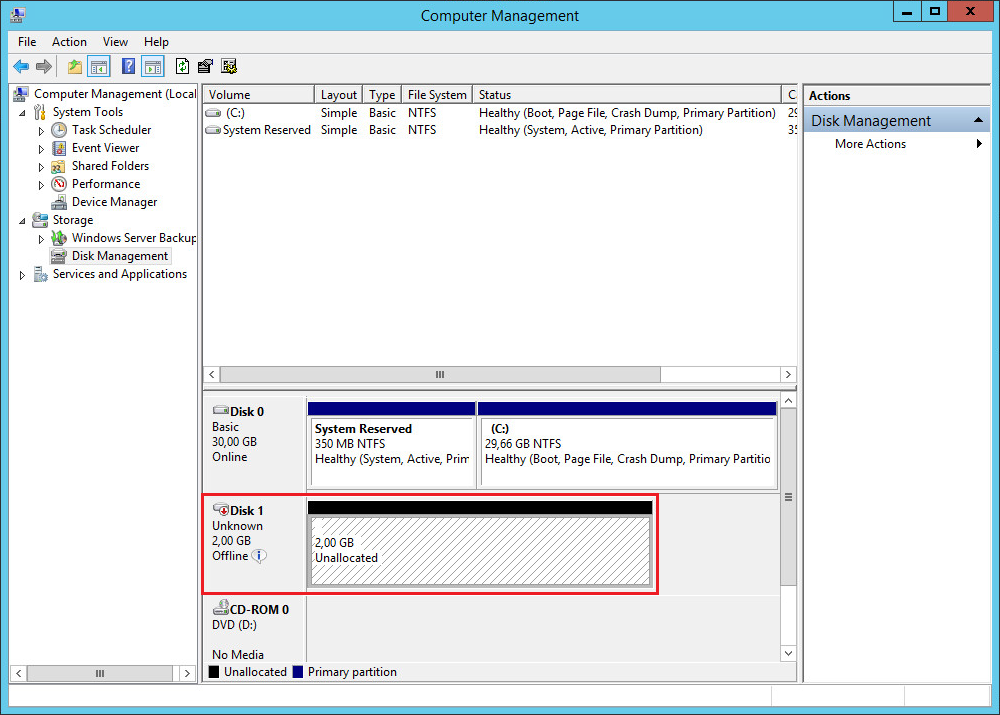
You’re ready to use the new iSCSI volume:
iSCSI Initiator
iSCSI (Internet Small Computer System Interface) is a protocol that allows SCSI commands to be transmitted over a network. Typically iSCSI is implemented in a SAN (Storage Area Network) to allow servers to access a large store of hard drive space. The iSCSI protocol refers to clients as initiators and iSCSI servers as targets.
Ubuntu Server can be configured as both an iSCSI initiator and a target. This guide provides commands and configuration options to setup an iSCSI initiator. It is assumed that you already have an iSCSI target on your local network and have the appropriate rights to connect to it. The instructions for setting up a target vary greatly between hardware providers, so consult your vendor documentation to configure your specific iSCSI target.
iSCSI Initiator Install
To configure Ubuntu Server as an iSCSI initiator install the open-iscsi package. In a terminal enter:
sudo apt install open-iscsi
iSCSI Initiator Configuration
Once the open-iscsi package is installed, edit /etc/iscsi/iscsid.conf changing the following:
node.startup = automatic
You can check which targets are available by using the iscsiadm utility. Enter the following in a terminal:
sudo iscsiadm -m discovery -t st -p 192.168.0.10
- -m: determines the mode that iscsiadm executes in.
- -t: specifies the type of discovery.
- -p: option indicates the target IP address.
Change example 192.168.0.10 to the target IP address on your network.
If the target is available you should see output similar to the following:
192.168.0.10:3260,1 iqn.1992-05.com.emc:sl7b92030000520000-2
The iqn number and IP address above will vary depending on your hardware.
You should now be able to connect to the iSCSI target, and depending on your target setup you may have to enter user credentials. Login to the iSCSI node:
sudo iscsiadm -m node --login
Check to make sure that the new disk has been detected using dmesg:
dmesg | grep sd

[    4.322384] sd 2:0:0:0: Attached scsi generic sg1 type 0
[    4.322797] sd 2:0:0:0: [sda] 41943040 512-byte logical blocks: (21.4 GB/20.0 GiB)
[    4.322843] sd 2:0:0:0: [sda] Write Protect is off
[    4.322846] sd 2:0:0:0: [sda] Mode Sense: 03 00 00 00
[    4.322896] sd 2:0:0:0: [sda] Cache data unavailable
[    4.322899] sd 2:0:0:0: [sda] Assuming drive cache: write through
[    4.323230] sd 2:0:0:0: [sda] Cache data unavailable
[    4.323233] sd 2:0:0:0: [sda] Assuming drive cache: write through
[    4.325312]  sda: sda1 sda2 < sda5 >
[    4.325729] sd 2:0:0:0: [sda] Cache data unavailable
[    4.325732] sd 2:0:0:0: [sda] Assuming drive cache: write through
[    4.325735] sd 2:0:0:0: [sda] Attached SCSI disk
[ 2486.941805] sd 4:0:0:3: Attached scsi generic sg3 type 0
[ 2486.952093] sd 4:0:0:3: [sdb] 1126400000 512-byte logical blocks: (576 GB/537 GiB)
[ 2486.954195] sd 4:0:0:3: [sdb] Write Protect is off
[ 2486.954200] sd 4:0:0:3: [sdb] Mode Sense: 8f 00 00 08
[ 2486.954692] sd 4:0:0:3: [sdb] Write cache: disabled, read cache: enabled, doesn't
 support DPO or FUA
[ 2486.960577]  sdb: sdb1
[ 2486.964862] sd 4:0:0:3: [sdb] Attached SCSI disk
In the output above sdb is the new iSCSI disk. Remember this is just an example; the output you see on your screen will vary.
Next, create a partition, format the file system, and mount the new iSCSI disk. In a terminal enter:
sudo fdisk /dev/sdb
n
p
enter
w
The above commands are from inside the fdisk utility; see man fdisk for more detailed instructions. Also, the cfdisk utility is sometimes more user friendly.
Now format the file system and mount it to /srv as an example:
sudo mkfs.ext4 /dev/sdb1
sudo mount /dev/sdb1 /srv
Finally, add an entry to /etc/fstab to mount the iSCSI drive during boot:
/dev/sdb1 /srv ext4 defaults,auto,_netdev 0 0
It is a good idea to make sure everything is working as expected by rebooting the server.
#iscsi
#linuxiscsi
To solve this problem use, GNU parted command with GPT. It supports Intel EFI/GPT partition tables. Partition Table (GPT) is a standard for the layout of the partition table on a physical hard disk. It is a part of the Extensible Firmware Interface (EFI) standard proposed by Intel as a replacement for the outdated PC BIOS, one of the few remaining relics of the original IBM PC. EFI uses GPT where BIOS uses a Master Boot Record (MBR).

(Fig.01: Diagram illustrating the layout of the GUID Partition Table scheme. Each logical block (LBA) is 512 bytes in size. LBA addresses that are negative indicate position from the end of the volume, with −1 being the last addressable block. Imaged Credit Wikipedia)
Linux GPT Kernel Support
EFI GUID Partition support works on both 32bit and 64bit platforms. You must include GPT support in the kernel to use GPT. If you don’t add GPT support in Linux kernel, after rebooting the server, the file system will no longer be mountable, or the GPT table will get corrupted. By default, Redhat Enterprise Linux / CentOS comes with GPT kernel support. However, if you are using Debian or Ubuntu Linux, you need to recompile the kernel. Set CONFIG_EFI_PARTITION to y to compile this feature. Please note that almost all new kernel and latest distro supports GPT.
File Systems
   Partition Types
     [*] Advanced partition selection
     [*] EFI GUID Partition support (NEW)
....
Find Out Current Disk Size
Type the following command:
Sample outputs:
# fdisk -l /dev/sdbSample outputs:
Disk /dev/sdb: 3000.6 GB, 3000592982016 bytes
255 heads, 63 sectors/track, 364801 cylinders
Units = cylinders of 16065 * 512 = 8225280 bytes
Sector size (logical/physical): 512 bytes / 512 bytes
I/O size (minimum/optimal): 512 bytes / 512 bytes
Disk identifier: 0x00000000

Disk /dev/sdb doesn't contain a valid partition table
Linux Create 3TB partition size
To create a partition start GNU parted as follows:
Output:
# parted /dev/sdbOutput:
GNU Parted 2.3
Using /dev/sdb
Welcome to GNU Parted! Type 'help' to view a list of commands.
(parted)
Creates a new GPT disklabel i.e. partition table:
(parted) mklabel gpt
Sample outputs:
Warning: The existing disk label on /dev/sdb will be destroyed and all data on this disk will be lost. Do you want to continue?
Yes/No? yes
(parted)
Next, set the default unit to TB, enter:
(parted) unit TB
To create a 3TB partition size, enter:
(parted) mkpart primary 0 0
OR
(parted) mkpart primary 0.00TB 3.00TB
To print the current partitions, enter:
(parted) print
Sample outputs:
Model: ATA ST33000651AS (scsi)
Disk /dev/sdb: 3.00TB
Sector size (logical/physical): 512B/512B
Partition Table: gpt

Number  Start   End     Size    File system  Name     Flags
 1      0.00TB  3.00TB  3.00TB  ext4         primary
Quit and save the changes, enter:
(parted) quit
Sample outputs:
Information: You may need to update /etc/fstab.
Use the mkfs.ext3 or mkfs.ext4 command to format the file system, enter:
OR
Sample outputs:
# mkfs.ext3 /dev/sdb1OR
# mkfs.ext4 /dev/sdb1Sample outputs:
mkfs.ext4 /dev/sdb1
mke2fs 1.41.12 (17-May-2010)
Filesystem label=
OS type: Linux
Block size=4096 (log=2)
Fragment size=4096 (log=2)
Stride=0 blocks, Stripe width=0 blocks
183148544 inodes, 732566272 blocks
36628313 blocks (5.00%) reserved for the super user
First data block=0
Maximum filesystem blocks=4294967296
22357 block groups
32768 blocks per group, 32768 fragments per group
8192 inodes per group
Superblock backups stored on blocks:
 32768, 98304, 163840, 229376, 294912, 819200, 884736, 1605632, 2654208,
 4096000, 7962624, 11239424, 20480000, 23887872, 71663616, 78675968,
 102400000, 214990848, 512000000, 550731776, 644972544

Writing inode tables: done
Creating journal (32768 blocks): done
Writing superblocks and filesystem accounting information: done

This filesystem will be automatically checked every 31 mounts or
180 days, whichever comes first.  Use tune2fs -c or -i to override.
Type the following commands to mount /dev/sdb1, enter:
Sample outputs:
# mkdir /data
# mount /dev/sdb1 /data
# df -H
Sample outputs:
Filesystem             Size   Used  Avail Use% Mounted on
/dev/sdc1               16G   819M    14G   6% /
tmpfs                  1.6G      0   1.6G   0% /lib/init/rw
udev                   1.6G   123k   1.6G   1% /dev
tmpfs                  1.6G      0   1.6G   0% /dev/shm
/dev/sdb1              3.0T   211M   2.9T   1% /data
Make sure you replace /dev/sdb1 with actual RAID or Disk name or Block Ethernet device such as /dev/etherd/e0.0. Do not forget to update your /etc/fstab file, if necessary. Also note that booting from a GPT volume requires support in your BIOS / firmware. This is not supported on non-EFI platforms. I suggest you boot server from another disk such as IDE / SATA / SSD disk and store data on /data. It is also possible to use the whole disk such as /dev/sdb if needed. Please note that the latest version of fdisk dose support GPT. From the man page:
Say hello to gdisk
The gdisk is an GPT alternative to fdisk command. The syntax is same as fdisk command. For example:
OR
Sample outputs:
$ sudo fdisk /dev/sdbOR
$ sudo gdisk /dev/sdbSample outputs:
GPT fdisk (gdisk) version 1.0.1

Partition table scan:
  MBR: not present
  BSD: not present
  APM: not present
  GPT: not present

Creating new GPT entries.

Command (? for help):
Type n to create a new partition:
Command (? for help): n
Partition number (1-128, default 1): 1
First sector (34-XXXXXXX, default = 2048) or {+-}size{KMGTP}:
Last sector (2048-XXXXXXX, default = XXXXXXX) or {+-}size{KMGTP}:
Current type is 'Linux filesystem'
Hex code or GUID (L to show codes, Enter = 8300)
Press w to write new table to disk and exit to the shell prompt:
Command (? for help): w
Final checks complete. About to write GPT data. THIS WILL OVERWRITE EXISTING
PARTITIONS!!

Do you want to proceed? (Y/N): y
OK; writing new GUID partition table (GPT) to hdd.img.
Warning: The kernel is still using the old partition table.
The new table will be used at the next reboot or after you
run partprobe(8) or kpartx(8)
The operation has completed successfully.
Now you can format /dev/sdb1 and mount it as usual.
* Para adicionar o target no linux
iscsi initiator
https://help.ubuntu.com/lts/serverguide/iscsi-initiator.html
*Montar particoes acima de 2 TB
https://www.cyberciti.biz/tips/fdisk-unable-to-create-partition-greater-2tb.html
