cid join domain=empresa.lan user=Administrator pass=********
add-apt-repository ppa:emoraes25/cid && apt-get update
apt-get install cid cid-gtk
cid join domain=empresa.lan user=Administrator pass=********
nmap -sS -v -Pn -A --open --script=vuln + IP do Alvonmap -sS -v -Pn -A --open --script=vuln + IP alvo/24
nmap -v –sV -Pn -O —open + IP do alvonmap –script=asn-query,whois-ip,ip-geolocation-maxmind + IP do alvonmap -f -sV -A + IP do alvo (Neste comando ocorre a fragmentação de pacotes que serão enviados para se conectar ao alvo)nmap -sS -sV -A + IP do alvo (Faz varreduras do tipo SYN na rede alvo)nmap -Pn -sV -A + IP do alvo (Não enviar pacotes ICMP para o alvo, ou seja, não pingar na rede)nmap –sS www.alvo.com —verbose –data-string “Você está sendo ownado, admin!”nmap -sU -A -PN -n -pU:19,53,123,161 –script=ntp-monlist,dns-recursion,snmp-sysdescr + IP do alvonmap --script=mysql-brute + IP do alvoAlguns comandos com Nmap em rede interna:
nmap 192.168.0.1/24O fato de não se fazer muito barulho na rede deve-se ao fato de não realizar a busca de endereços do MAC e para que isso não ocorra, utilizamos o comando “–send-ip”. Exemplo:
nmap –T0 –send-ip 192.168.0.1/24 (O parâmetro “-T0” é utilizado para se fazer um Scan mais demorado na rede a ponto de não levantar tanta suspeita do alvo).
*Se o alvo estiver fora da rede, a opção “–send-ip” pode ser ignorada com segurança.
Você também pode automatizar todos esses comandos utilizando nossa plataforma de pentest em nuvem que facilitada todas as consultas e realiza comandos avançados, conheça o HStrike: https://hstrike.com/
Inicialmente, a mais óbvia. Troque a porta default de 22 para alguma que esteja acima de 5000. Os bots, geralmente, só testam senhas em SSH configurados na porta 22. Para trocar a porta, no Debian, edite o arquivo /etc/ssh/sshd_config e procure pela linha Port 22. Depois de alterar a porta, reinicie e o serviço com o comando:
# /etc/init.d/ssh restart
Há várias coisas legais que podem ser feitas, tudo já divulgado aqui no Dicas-L por outros autores. Desabilitar o login pelo root, só permitir login utilizando certificado etc. Mas digamos que você precise do método de autenticação tradicional, com usuário e senha. Uma coisa é certa: nada de senha óbvia. Use senhas com oito caracteres ou mais, contendo letras, números e caracteres especiais. Além disso, instale o fail2ban.
O fail2ban é um sistema de verificação de falha de autenticação. Pode ser utilizado com inúmeros serviços. Um deles é o SSH. Então, digamos que alguém tente um login por SSH e erre X vezes o usuário, a senha ou ambos. O IP desse usuário será bloqueado por N segundos. É isso que o fail2ban faz. Inicialmente, instale-o com:
# apt-get install fail2ban
A seguir, edite o arquivo /etc/fail2ban/jail.conf e, na seção [ssh], altere a entrada
maxretry = 6
para
maxretry = 3
Ainda, abaixo da citada linha (maxretry = 3), acrescente:
bantime = 3600
Reinicie o serviço fail2ban:
# /etc/init.d/fail2ban restart
No caso, o fail2ban foi configurado para, na ocorrência de três tentativas sem sucesso de autenticação SSH, bloquear por 1 hora (3600 segundos) o IP do atacante. O bloqueio se dará por Netfilter (ativado pelo fail2ban via comando iptables).
Por fim, o pior problema que pode acontecer numa invasão é você nunca ficar sabendo que ela ocorreu. Então, você precisa do samhain. O samhain é responsável por lhe avisar quando qualquer arquivo ou diretório que esteja na relação de vigilância dele for alterado. Uma das formas de ser avisado é por e-mail. Então, instale o samhain com o comando:
# apt-get install samhain
Considerando que você esteja querendo vigiar por e-mail o servidor que recebeu o samhain, instale o sendmail em tal servidor para que este possa enviar e-mails.
# apt-get install sendmail
O sendmail será instalado de forma que só a máquina local possa enviar mensagens (não haverá portas abertas para fora). Isso poderá ser verificado com o comando:
# netstat -tunlp
A seguir, edite o arquivo /etc/aliases e, no fim, insira a linha:
root: seu_endereço_de_email
Ou seja: quando o samhain enviar um mail local para o root, ele será redirecionado para o seu e-mail. Para validar a configuração anterior, execute o comando:
# newaliases
Se for necessário, no arquivo /etc/samhain/samhainrc você poderá configurar quais arquivos e diretórios devem ser observados ou não. Dentro do arquivo tem toda a explicação de como fazer. Leia o arquivo desde do início. Você poderá utilizar wildcards etc.
É lógico que existem outras artimanhas e programas que podem ser utilizados. Mas com o que escrevi aqui, com certeza, o grau de segurança do seu servidor SSH aumentará bastante.
Editar o arquivo
/etc/security/limits.conf
### inserido por fabiano em 04022021 ###
* soft nofile 204576 unset
* hard nofile 204576 unset
root soft nofile 204576 unset
root hard nofile 204576 unset
* soft memlock 204576 unset
* hard memlock 204576 unset
reboot
Recovery - Proxmox e VMs
Important Note :
If you want to use xRDP in conjunction with the Unity Desktop interface, please check the following post : XRDP – How To Remote Connect to Unity Desktop on Ubuntu 16.04
Hello World,
In our previous post, we have quickly provided a step by step instructions on how to perform a fresh installation of Ubuntu 16.04. If you are working with Ubuntu since a long time, you know that no major changes have been introduced in the setup process and wizard. It’s quite straightforward.
xrdp is a great solution when you need to have coexistence between Windows machines and Linux machine. xrdp is basically a piece of software that allows you to remote desktop into your Ubuntu machine from a Windows computer. On the Windows machine, you do not need to install any tools, you simply use the standard and builtin tool Remote Desktop Connection.
In the past, we have described how to install xrdp on the previous releases of Ubuntu( 15.10,15.04,14.10,14.04,..). The process described to install xrdp on Ubuntu 16.04 is exactly the same as the one described for machines running Ubuntu 15.10. So, instead of going really deep into details, we will provide hereafter the necessary steps needs to be performed in order to have xrdp installed on your system.
So, let’s go
For this post, we have make some assumptions.
A standard installation for us means that we will be using the xrdp package available within the Ubuntu repository. To install the xrdp software from Ubuntu repository, you will need to issue the following command in a terminal.
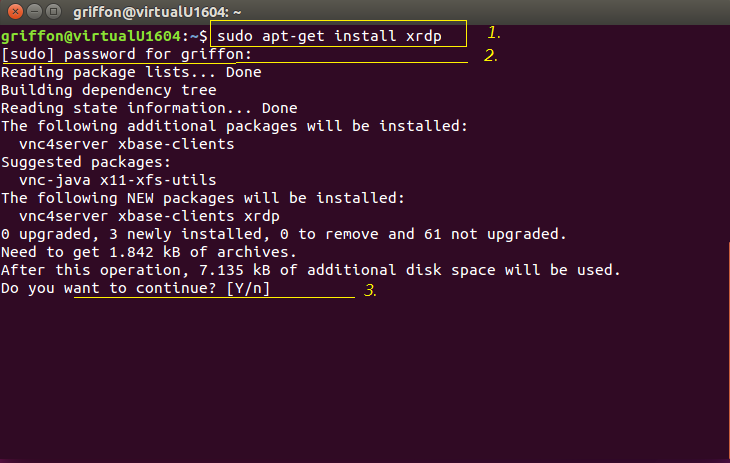
sudo apt-get install xrdp
Because of the sudo command, you will be prompted for a password. After entering your password, you will be asked to confirm your action by pressing Y (see screenshot below)
Click on picture for better resolution
xrdp and Unity desktop (or Gnome 3) are not working well together. If you do not install another desktop environment, when you will try to connect to your Ubuntu machine, you will see only a gray screen. The workaround to this situation is to install an alternate desktop that can work with xrdp software solution.
Our preferred desktop alternative is Mate-Desktop. This post will show you how to install the Mate-Desktop and have it working with the xrdp software solution.
To install the Mate-desktop, issue the following command from the Terminal Session
sudo apt-get update
sudo apt-get install mate-core mate-desktop-environment mate-notification-daemon
Note :
Desktop interface such as xfce, LXDE,LXQT, KDE are all potential candidates. Check the following links for more information and installation and configuration procedures
At this stage, we need to configure our system in order to tell xrdp that an alternate desktop needs to be used. In our case, we have to tell xrdp that we want to use Mate-Desktop as alternate desktop. With the previous version of Ubuntu, you would need to create the ~/.xsession file. In Ubuntu 16.04, it seems that this approach is not working anymore. We need to configure the system differently when working with Ubuntu 16.04
Important Note :
In our scenario, we have installed mate-desktop, If you have installed another Desktop alternative, you will have to adapt the configuration of the startwm.sh file to reflect your settings.
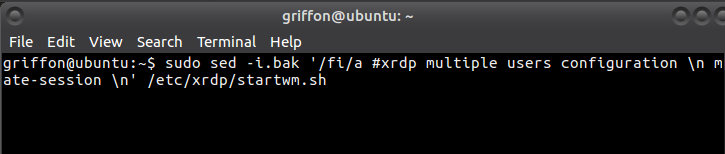
If you use the ~/.xsession file approach, you will experience the same symptoms as before i.e. grey screen. We will need to configure the system in a different way. To have xRDP working in Ubuntu 16.04, you will need to update the /etc/xrdp/startwm.sh file. To configure this, issue the following command in your Terminal console
sudo sed -i.bak '/fi/a #xrdp multiple users configuration \n mate-session \n' /etc/xrdp/startwm.sh
Click on picture for better resolution
Note :
Remember that the command above is to be used when you have installed the Mate-Desktop. If you have installed a different desktop environment, you will need to adapt the command accordingly. Please check the following links
By default, the xRDP login screen will use an en-us keyboard layout. You remote session will also be using the en-us keyboard layout. If you are using a different keyboard layout than the english one, you need to perform the following actions in order to update the configuration of the xrdp software.
In my case, I’m using a Belgian French keyboard, so I had to tell xrdp to use the belgian french keyboard as well. To do that, you need to perform the following actions :
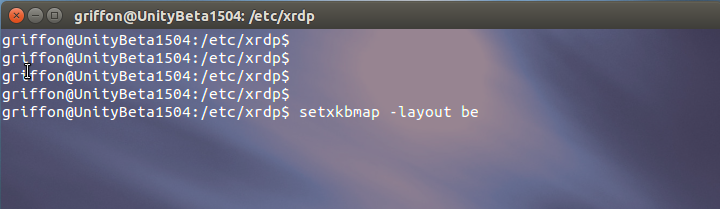
Step 1 : You go to the /etc/xrdp directory
Step 2 : you issue the command setxkbmap -layout <%your layout%> to define which keyboard map/layout to use
Click on Picutre for better Resolution
Step 3 : create a copy of the km-0409.ini file into the same directory. It seems that this is the default file used by xrdp to define the keyboard layout. You will need to use sudo in order to be able to write into the directory
Step 4 : Check that you have a backup of your file by typing the dir or ls command
Step 5 : update the file by issuing the following command sudo xrdp-genkeymap km-0409.ini
Click on Picutre for better Resolution
Since Ubuntu 14.10, a new xrdp package has been made available in the Ubuntu repository. This package fixes a long time issue related to the fact that users could not reconnect to the same session. If you are using the package xrdp 0.6.1-1, you do not need to perform any customization, you will reconnect automatically to the same session.
As we can see, the installation process has not changed much and after performing all the necessary configuration steps, you should be able to connect remotely to your Ubuntu machine using the Remote Desktop Connection tool.
Some people are still facing some issues while using xrdp. If you have any issues, connecting or using xrdp, please leave a comment and will contact you back in order centralize and collect as much information possible about the issue and publish the workaround founded (if any) for the mentioned problem.
That was an easy post 
Till next time
See ya